
How to create a Facebook group
More than one billion Facebook users are members of Facebook groups.
In December 2015, they left about 10 billion comments in various groups and generated 25 billion-plus likes on group posts.
Don’t you want to be part of that Facebook group action?
You can not only be part of it — you can lead it by creating your own Facebook group. It’s not hard to do it. In fact, it’s so easy even I can do it.
(Not sure about the difference between a Facebook group, Page, and profile? Read, “Facebook profile, Page, or group? An author’s primer.“)
Why you want to create a Facebook group
A Facebook group lets you build a community around a shared interest, issue, or cause. People join groups to learn, share, and discuss.
A group isn’t an overt book promotion tool in the same way that a Facebook ad is. A group lets you get to know people who share your interest. For authors, that should be something related to your book or its genre (for example, a group for people who read BWWM — black women/white men — romance novels).
While you get to know them, they get to know you, too. Perhaps you share snippets of your writing, offer advice related to your expertise, or help people make connections.
The point is: When you create a group, you create the foundation for a community built around a shared interest in something related to your book.
That’s a quick overview of the “why.” What about the “how?”
How to create your Facebook group
Before creating your group, I recommend you a join a few Facebook groups related to your interests so you can see how they work. Observing a variety of groups for a while will help you figure out what you want to achieve with yours, and maybe even how to do that.
Once you’re familiar with them, the process is pretty simple. I’ll walk you through the process using screenshots I grabbed when I created the Build Book Buzz Facebook group two years ago. (To see a larger version of any of the images below, just click on the image.)
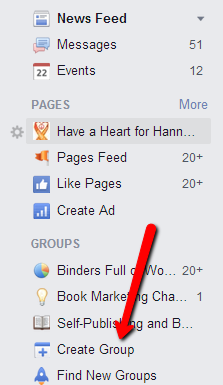
Login to your Facebook account. On the right side of your newsfeed where you find your activity options, select “Create Group” under “Groups.”
A window pops up that asks you for the group name. I want you to know this in advance so that you already know what you want to name your group. This is important, right? You want to be thoughtful about the name. There’s no need to agonize over it, but it should communicate what the group’s about.

In that same window, you have to select your group’s privacy — open, closed, or secret. If you’re not sure already, read this article, “What are the privacy settings for groups?” The Build Book Buzz group is “closed,” which means that it can be found in a search, but what happens in the group stays in the group.
Staying in that window, now you have to invite members. My reaction to this was, “What??? Already? I haven’t even seen my group on the screen yet!”
Yeah, too bad. This is how they roll on The Facebook.
I invited just one friend at this point only because I had to. I invited others later, after the group was set up.
Click “Create” and you move to a screen that lets you select an icon for your group. The icon shows up next to the group name in members’ groups list on the left side of the timeline. I chose a book for the Build Book Buzz group. (That was a no-brainer.) You can also skip this step if you want.
![]()
Select “Okay” and like magic, your group appears in front of you!
Now you upload a cover photo. It works the same way as it does for your profile — just select “upload photo” and select one that’s waiting on your computer.
Tip: Now that you realize you have to do this, have your image pre-selected.
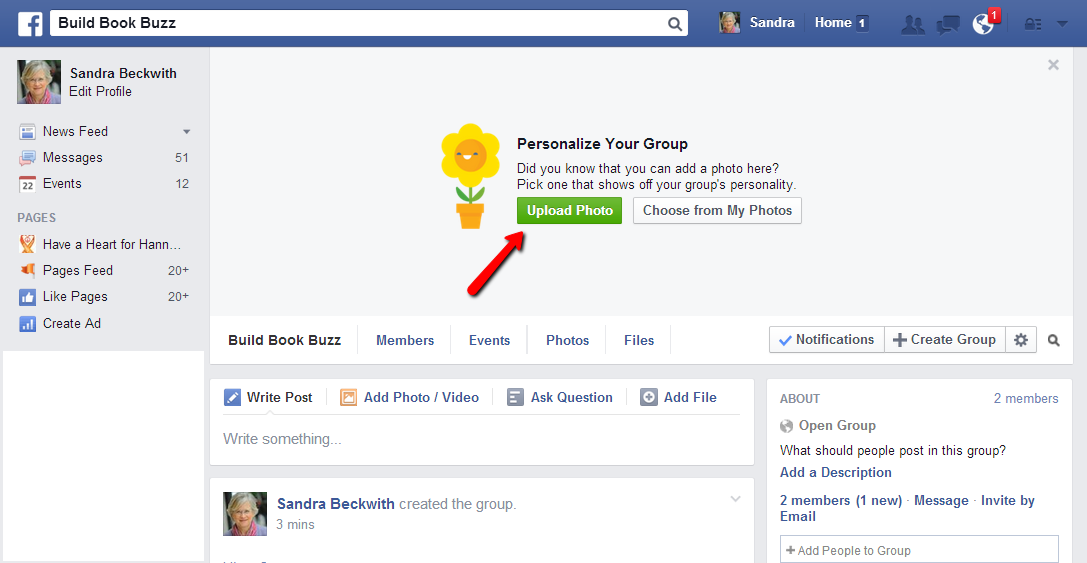
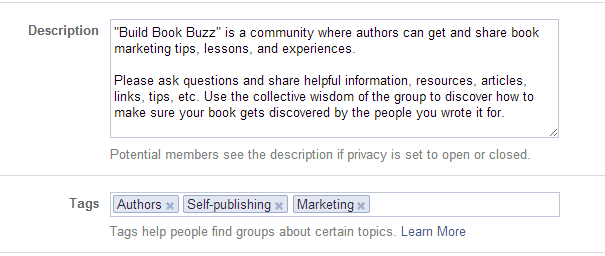
With the group cover photo set the way you want at the top, move to the right side of the screen to describe the group and add tags.
Find the “Description” section on the right and select “Add a Description.”
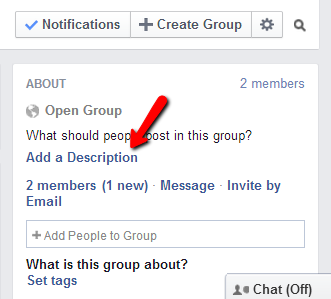
Your description should tell people what to expect from the group and why they will want to be a member. What’s in it for them? Include any group rules, too.
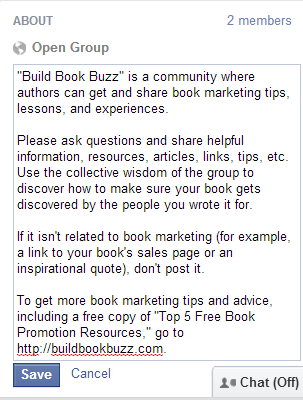
Then add the “tags” using that option just underneath your description. Tags are words related to the group topic that help Facebook users find your group in searches or through Facebook recommendations.
Next, you determine your group’s Facebook web address — the URL you will send people to when you’re sharing information about your group — and the email address linked to it, which, by the way, I have never used.
To do this, click on the three dots next to the word “Notifications” at the lower right of your cover image. Select “Edit Group Settings.”
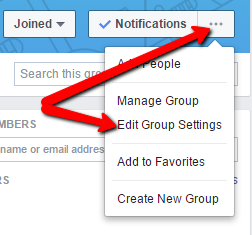
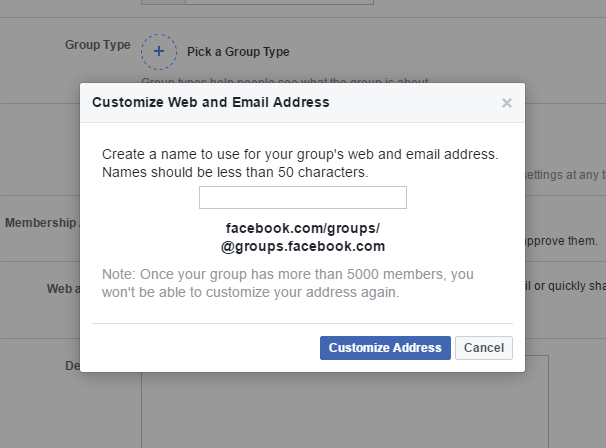
On the next screen, next to “Web and Email Address” select “Customize Address.” This will let you create a URL for your group with the official group name rather than a string of numbers.
Type in your group name (or whatever you want in the web address). Select “Customize Address” at the bottom.
While still in the settings, you can select preferences for membership approval, posting permission, and posting approval.
In my group, everyone can post and what they share goes live immediately — it doesn’t wait for my approval. If someone posts something that’s counter to the rules, I delete it. If they do it repeatedly, I remove them from the group. Select preferences that work for your group goals. If one of them is discussion and engagement, then don’t put any limits on that.
Your group is now ready to share with the world! Select “Discussion” in the upper left under your cover photo to return to your group’s home page. Add people using the “Add Members” box on the upper right under the cover image or by sending them the link to the group and asking them to join it.
That wasn’t hard, was it?
Do you have a Facebook group? What’s the URL for it, and why did you create it? Please tell us in a comment.
Like what you’re reading? Get it delivered to your inbox every week by subscribing to the free Build Book Buzz newsletter. You’ll also get my free “Top 5 Free Book Promotion Resources” cheat sheet immediately!
Thanks for the tut, Sandra. Good info as always. I have an author Facebook page but am often asked by newbies HOW to set one up. I will point them to your post that I’m sharing on Pinterest.
Thanks, Cat! Just to be clear, these instructions are for setting up a Facebook GROUP, which is different from a Page.
Sandy
Hi Sandy,
I’ve been pondering whether to set up a group. I have several Pages that I set up back in the day, but didn’t want to have a Page and a Group for each. I currently moderate a group for a colleague, but it’s time to decide if a group would be more beneficial for me, and let go of the pages.
Thanks for this clear explanation of the process.
Hey, Flora, Pages and groups serve very different purposes, so what you do depends on your goals. Pages provide a vehicle for sharing information — they’re almost a different type of website. Groups are more like mini communities — they compare to forums, bulletin boards, etc. Once a group is established and takes off. it can run itself, as group members start discussions and support each other. That can’t happen with a Page — the Page owner has to be the source of content, etc.
If you decide to start a group, I’d encourage you to keep your Pages, or reduce the number of them. Pages do serve a purpose and have value.
Sandy